
If you have every watched any Youtube video of late you will note that there are plenty of Youtubers and other influencers hailing the virtues of using a VPN, generally these are paid VPN plans that may come with other features but I am too cheap to pony up the cash for these VPNs, so I started looking at free alternatives. My favourite free alternative that does all that I need is Cloudflare’s Warp app, there is no signup and it installs easily and fast on Windows. On Ubuntu (the OS I use on a laptop) you will have to get your hands dirty with the command line to install it. Also the official instructions are a bit lacking if your not a Linux expert and the app on Linux lacks the nice tray icon of its Windows counterpart. This post attempts to solve both of these issues, so if you are considering installing a free VPN on Ubuntu, read ahead.
Installing Cloudflare Warp on Ubuntu
The official instructions for installing Cloudflare Warp on Ubuntu https://pkg.cloudflareclient.com are mainly designed for LTS versions, as I am installing it on Questing Quokka (25.10) these instructions will fail. So below is what I used to install on Questing Quokka using the most recent repository (Noble Numbat 24.04). If you have issues installing via the official instructions and you know that your are not on a LTS version of Ubuntu, you may want to try below in the terminal.
echo "deb [signed-by=/usr/share/keyrings/cloudflare-warp-archive-keyring.gpg] https://pkg.cloudflareclient.com/ noble main" | sudo tee /etc/apt/sources.list.d/cloudflare-client.list
sudo apt update
sudo apt install cloudflare-warp
Cloudflare only provides one Linux client (cloudflare-warp), and it supports both:
WARP (same as the 1.1.1.1 consumer app)
Zero Trust / Teams
On Linux it defaults to Zero Trust mode, but we want to switch it to consumer WARP mode which has zero setup, so lets do the following.
warp-cli --accept-tos registration new
warp-cli --accept-tos mode warp
warp-cli --accept-tos connect
Then check status:
warp-cli status
You should see something like:
Status update: Connected
Mode: WARP
Other useful commands
warp-cli connect
warp-cli disconnect
warp-cli status
Optional auto connect on boot
warp-cli enable-always-on
Now you have Cloudflare Warp installed and if it is connected you should see your IP address change if you hop over to a site like whatismyip.com.
Create a Fully Functional Cloudflare WARP Tray Indicator on Ubuntu
f you’re a fan of Cloudflare’s app on Windows, you’ll know how convenient it is to have a tray icon showing your connection status, public IP, and WARP mode, with a single click to connect or disconnect.
Linux doesn’t have an official version like Windows, but with a little setup, you can replicate it on Ubuntu using Python and AppIndicator.
Here’s how I built a fully working, auto-starting WARP tray client:
1. Prepare symbolic icons.
GNOME AppIndicator expects small monochrome SVG icons, not full-color images, otherwise it shows … in the panel. I hosted some for convenience on InspectMyGadgets.com, so run the following in the terminal to download.
mkdir -p ~/.local/share/warp-indicator
cd ~/.local/share/warp-indicator

curl -L -o warp-on.svg https://www.inspectmygadgets.com/warp-on.svg
curl -L -o warp-off.svg https://www.inspectmygadgets.com/warp-off.svg
the two icons are
warp-on.svg → green icon when WARP is connected
warp-off.svg → red icon when WARP is disconnected
These icons are 24×24 px SVG files that are single-color and are perfect for Ubuntu’s top panel.
2. Python tray indicator script.
Create the Python script:
nano ~/warp-indicator.py
Now paste the code from below
#!/usr/bin/env python3
import subprocess
import gi
import os
import urllib.request
import json

gi.require_version('Gtk', '3.0')
gi.require_version('AppIndicator3', '0.1')
from gi.repository import Gtk, AppIndicator3, GLib

ICON_ON = os.path.expanduser("~/.local/share/warp-indicator/warp-on.svg")
ICON_OFF = os.path.expanduser("~/.local/share/warp-indicator/warp-off.svg")

status_item = None
ip_item = None
warp_mode_item = None
toggle_item = None

def warp_connected():
output = subprocess.getoutput("warp-cli status")
return "Connected" in output

def warp_mode():
output = subprocess.getoutput("warp-cli status")
if "WARP+" in output:
return "WARP+"
return "WARP"

def public_ip():
try:
with urllib.request.urlopen("https://api.ipify.org?format=json", timeout=3) as response:
data = json.load(response)
return data.get("ip", "Unknown")
except:
return "Unknown"

def toggle(_):
if warp_connected():
subprocess.run(["warp-cli", "disconnect"])
else:
subprocess.run(["warp-cli", "connect"])
refresh()

def refresh():
if warp_connected():
indicator.set_icon_full(ICON_ON, "WARP Connected")
toggle_item.set_label("Disconnect WARP")
status_item.set_label("Status: Connected")
else:
indicator.set_icon_full(ICON_OFF, "WARP Disconnected")
toggle_item.set_label("Connect WARP")
status_item.set_label("Status: Disconnected")
ip_item.set_label(f"IP: {public_ip()}")
warp_mode_item.set_label(f"Mode: {warp_mode()}")
return True

def quit_app(_):
Gtk.main_quit()

indicator = AppIndicator3.Indicator.new(
"warp-indicator",
ICON_OFF,
AppIndicator3.IndicatorCategory.APPLICATION_STATUS
)
indicator.set_status(AppIndicator3.IndicatorStatus.ACTIVE)

menu = Gtk.Menu()

toggle_item = Gtk.MenuItem(label="Toggle WARP")
toggle_item.connect("activate", toggle)
menu.append(toggle_item)

status_item = Gtk.MenuItem(label="Status: Unknown")
status_item.set_sensitive(False)
menu.append(status_item)

ip_item = Gtk.MenuItem(label="IP: Unknown")
ip_item.set_sensitive(False)
menu.append(ip_item)

warp_mode_item = Gtk.MenuItem(label="Mode: Unknown")
warp_mode_item.set_sensitive(False)
menu.append(warp_mode_item)

quit_item = Gtk.MenuItem(label="Quit")
quit_item.connect("activate", quit_app)
menu.append(quit_item)

menu.show_all()
indicator.set_menu(menu)

GLib.timeout_add_seconds(5, refresh)

Gtk.main()
Now make it executable:
chmod +x ~/warp-indicator.py
Now you can manually test it with.
~/warp-indicator.py &
3. Make the indicator autostart.
If all went well above you may want to create an autostart file so the tray icon appears on login:
mkdir -p ~/.config/autostart
nano ~/.config/autostart/warp-indicator.desktop
Paste the following into the file:
[Desktop Entry]
Type=Application
Name=WARP Indicator
Comment=Cloudflare WARP tray indicator
Exec=/home/yourusername/warp-indicator.py
Icon=network-vpn
Terminal=false
X-GNOME-Autostart-enabled=true
Note: you need to replace /home/yourusername with your actual username path.
Make it executable:
chmod +x ~/.config/autostart/warp-indicator.desktop
4. Disable the Zero Trust taskbar icon.
When you installed the Zero Trust WARP package, it may leave a tray icon which is useless for us. Lets remove it permanently:
systemctl --user mask warp-taskbar.service
systemctl --user stop warp-taskbar.service
This keeps the VPN engine running but removes the official tray icon, letting your new indicator be the only one.
5. Final Tests.
Reboot your PC and you should see the following,
Green icon = WARP connected
Red icon = WARP disconnected
The menu shows status, public IP, and WARP/WARP+ mode
Click menu → connect/disconnect to instantly connect or disconnect
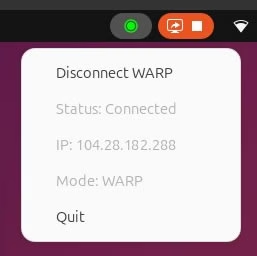
This setup gives you a fully functional, visually clear WARP tray indicator on Ubuntu that works like Windows tray client — no official Linux GUI needed.
Resources.
Cloudflare Warp Website https://one.one.one.one/
Cloudflare Warp Linux instructions https://pkg.cloudflareclient.com/
Icons used by my tray indicator script.
warp-on.svg → green icon
warp-off.svg → red icon
Final Note
This post is not sponsored by cloudflare, these instructions above are unofficial but worked at the time of writing.