My day job see me working for a few large corporations who generally love Cisco network gear. On the odd occasion I have been asked to swap out a Cisco Aironet 2600 WiFi access point. These solid looking devices are very common around corporate offices and shopping centres etc. In these applications the devices run a lightweight firmware that is all controlled centrally by the Cisco wireless LAN controller, so these devices are useless by themselves unless you upgrade the device to Cisco’s autonomous firmware.
By using the autonomous firmware you get an OK web GUI on the device that lets you configure the device as an access point. This makes it perfect as a range extender for your home. Often these devices can be found cheap after big corporate offices upgrade their equipment or as in my case the units were free as the network group considered them faulty. After replacing 2 of these units I suspected there was nothing wrong with the hardware, so I hung on to them instead of disposing of them in an environmentally friendly manner as what was requested.
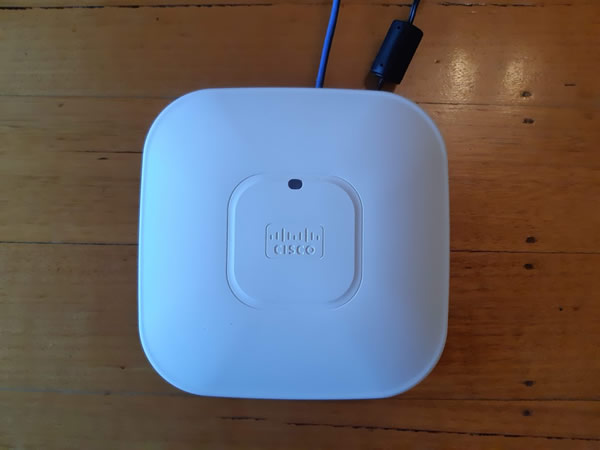
The devices themselves are pretty chunky and solid, my version has inbuilt antennas while others can have external antennas. There is not much on the device, just 1 multi-colour led, 1 console port, 1 Ethernet port, 1 48v DC port and a mode button. The Ethernet port supports POE (power over Ethernet). This option is how the majority of business’s power these devices as it makes it easy to roll them out or move them.
With the lightweight firmware on these devices you don’t get anything like a web GUI on the device in order to control it. Cisco do include a console port on their devices which we will get to shortly. To upgrade the firmware you will need to have a TFTP server loaded with the new firmware on a PC in order for the device to grab the new firmware and install it. You will also need a Cisco console cable to monitor what is going on while the firmware updates too via the console port. My Cisco console cable is a serial type cable but I believe cables with a built-in USB to serial adaptors are available now. I have an old laptop with a serial port I keep around just for these type of jobs, so I was good to go.
In order to get the latest firmware for the device you need to have a Cisco service contract account in order to download it from their site in most cases. This was something I didn’t have, so I found the filename of a few versions of the required firmware I needed on Cisco’s site and then googled the name to find 2 of them is some questionable places. While both flashed OK there were some bugs. One version was unable to pick the country code from the drop down box and one version was like it had files missing, as when you hit save on your settings you got a 404 error. Granted you can configure these devices from the command line but that was not what I was after.
Eventually I found a post on Cisco forum that stated the 404 error was a known thing and a later version of firmware resolves the issue. Fortunately this version is downloadable without a service contract and while it was listed for a different model of access point than mine, the filename was the same format and it worked, complete with a working drop down and no more 404 errors.
Breaking down the Cisco firmware file name
Looking at the file name below in my case with the Aironet 2600 all firmware files start with ap3g2- and differ after that. The most important part to find is one that matches the model you have and the next part of the name k9w7 which represent that this is the autonomous firmware. The lightweight firmware used in corporate environments will have a k9w8 instead of the k9w7 here. It is the autonomous firmware that we want, so we can use our AP at home in standalone mode. The next numbers represent the firmware revision so the higher number you can find the newer it is, which is always the best option. The Cisco website is a good reference even if you can’t download the file and have to find it through other means.
The file I used: ap3g2-k9w7-tar.153-3.JH.tar
Hooking it up for firmware upgrade
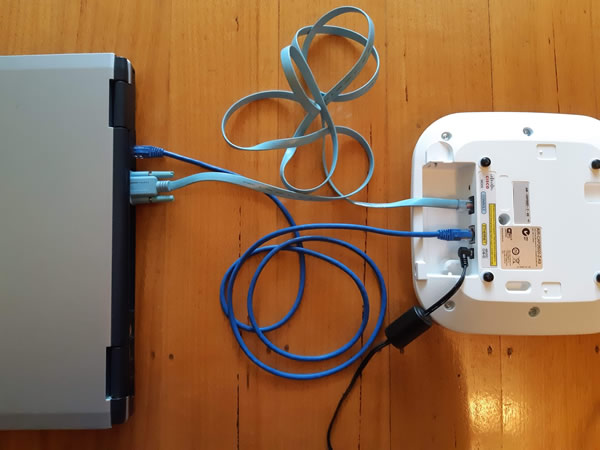
Doing the firmware update will mean some poking around with cables. Fortunately you should only need to do this once as future updates can be made by the GUI. If you only have one PC available you may want to download the firmware and needed files first before plugging in everything.
The Ethernet port on the AP will need to go to the network port of your PC and the console port will need to go to the serial port of your PC via the Cisco console cable (and a USB to Serial adaptor if your PC doesn’t have a serial port). The AP is either powered via a 48v Dc supply (which I had) or via a POE adaptor. If the POE setup is your plan to power it make sure you plug it in with the powered output going towards the AP and not your PC.
Software needed and PC setup
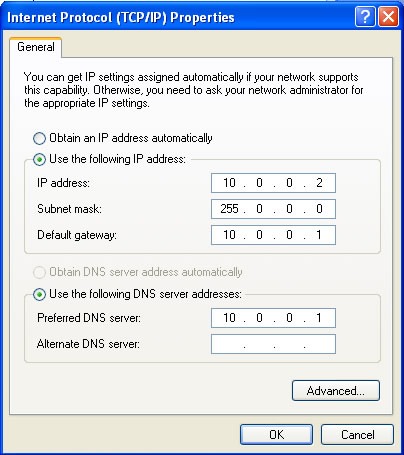
When we boot the AP in download mode it will default to the ip address of 10.0.0.1, so we need to set up our PC to a similar range number like shown below. The firmware will download via the Ethernet cable from the TFTP32 program we will install on our PC.
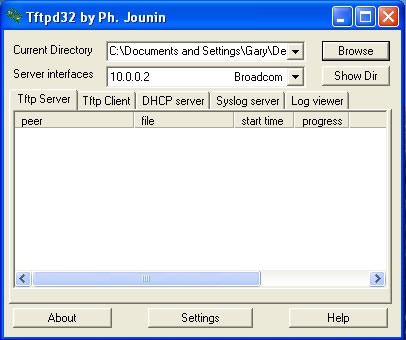
The TPFTP32 program has fairly simple setup, just select the interface and the directory where you stored the firmware file. I created a folder on the desktop called Cisco and had just the one firmware file in it.
In my case I needed to rename the file from ap3g2-k9w7-tar.153-3.JH.tar to ap3g2-k9w7-tar.default in order for the AP to recognise it. Also make sure there is no hidden extension as Windows will sometimes want to do.
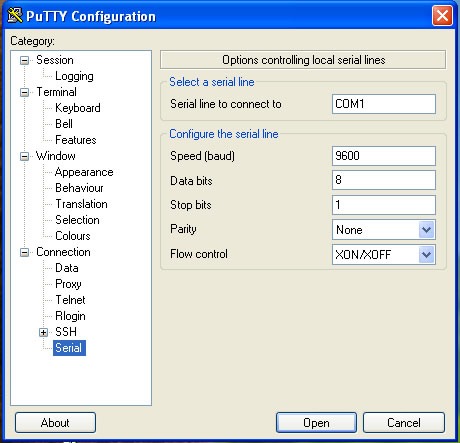
To see what is going on while everything is downloading you need to connect to the AP’s Console via the console cable and a terminal program known as PuTTY. Once PuTTY opens, head to the serial section and select your com port. In my case I was using my laptops built in com port which was COM1. If you are using a serial to USB adaptor it could be a different number, so check under control panel and device manager for the com ports installed on your PC once the adaptor is installed.
Once you open PuTTY you should connect to the AP, it will ask for the user and password which is both Cisco with an uppercase C. One command you could try and type is show version to prove that you are connected and find out what version of firmware is on the device currently.
Now that you have proved you are connected, pull the power to the AP and press and hold the mode button for over 20 seconds. You should get feedback via PuTTY with something like “button is pressed”. You can release the button after 20 seconds as the AP will now have grabbed the file off your TFTP server that is running on your PC and started to flash it to itself.
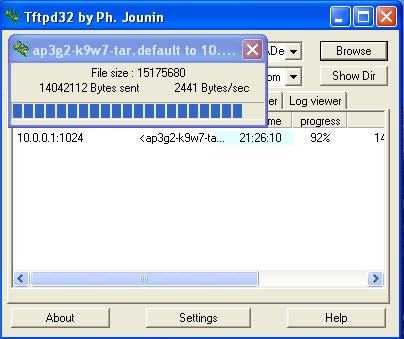
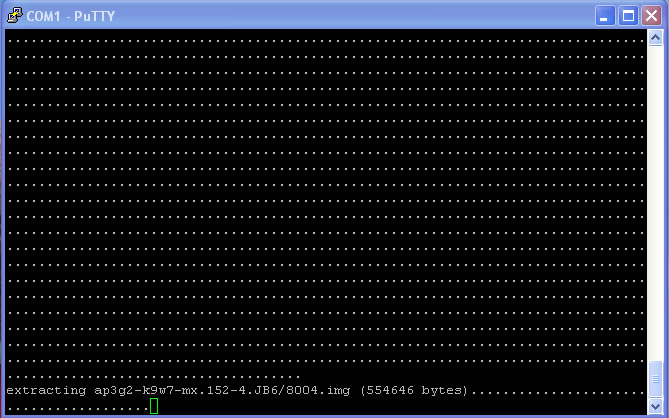
After some time (nearly 45ins in my case) the firmware will download and then extract and install. You can monitor its progress via both Tftp32 and PuTTY as shown below.
Once PuTTY shows that the firmware upload is complete and is back at a prompt you can disconnect the AP and connect it to your network.
It should grab an IP address off your Routers DHCP, so log into your router and see if there is a list of connected devices. It should have the name ap, so note its IP address down and type that into your browser and login with the user and password Cisco and Cisco when prompted.
From here there is a ton of settings, much more than any many other access points. The main settings you need to setup are the radios which are disabled by default and to setup your SSID and password.
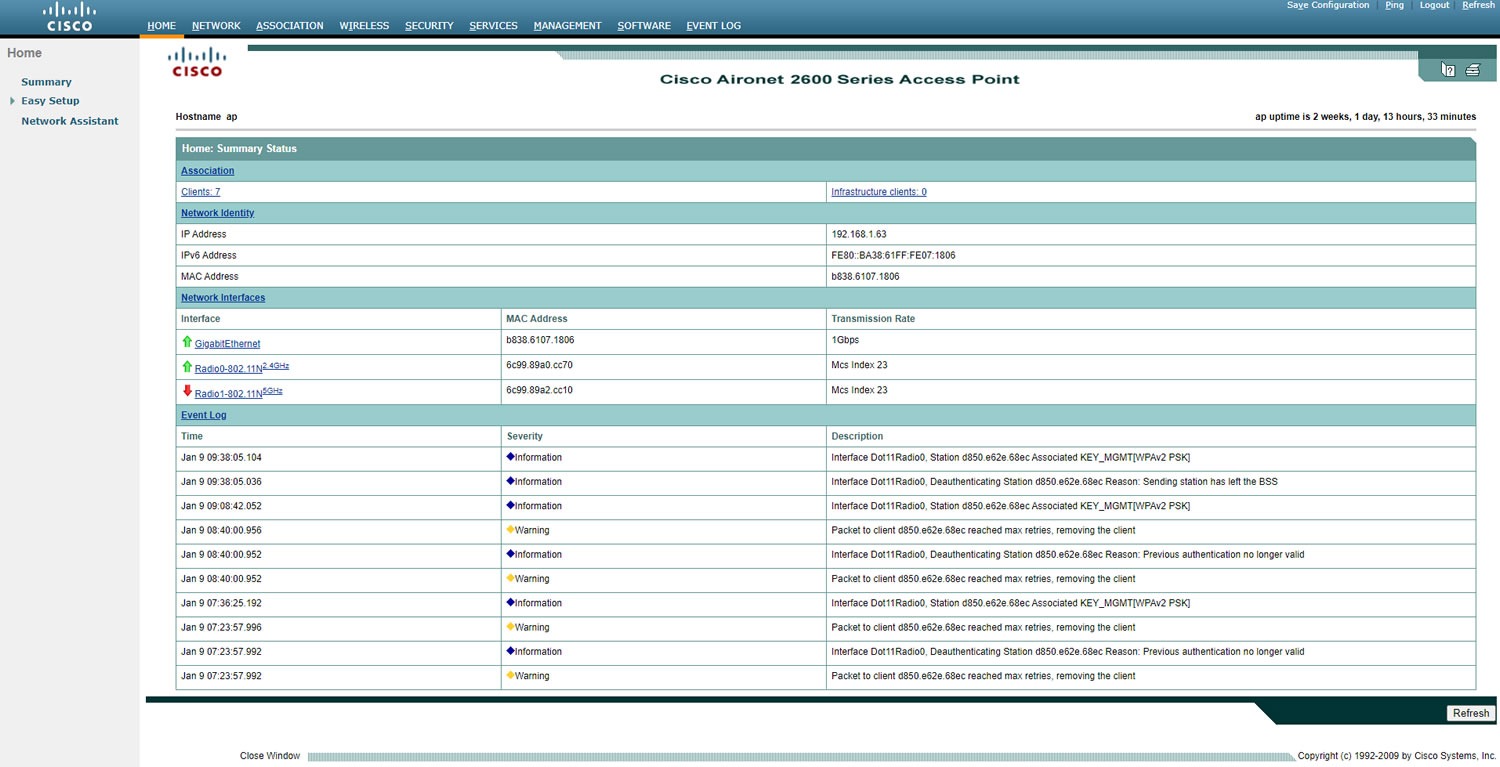
To enable the radios click on the radio next to the red arrows and adjust the setting to what you desire. Click apply at the bottom of the page and go back to the home page. Don’t be concerned if the arrow is not green yet as it took a minute or two for my setting to take effect. The next setup will be setting the SSID and password that is easily accessible via the easy setup page on the left. Once I was finished I hit save configuration on the top right of the screen to lock everything in. Some notable options on this AP is the ability to trade of bandwidth for range under the radio section. This was handy for me as I only intended for my IOT sensors to connect to this AP, which don’t need much bandwidth but do need good range.
Wrap up
These Cisco access points are a solidly built, highly configurable and a quality bit of hardware. The flaky GUI left a bit of a bad taste in my mouth, but once I got onto working version it was serviceable for what you need but it still had it quirks. I get that these are for enterprise use and most Cisco guys servicing the stuff are comfortable with setting it up in other ways. I don’t remember too much from that 2 day Cisco course I did 10 years ago to want to waste time playing with these things like that. A lot of the errors in the GUI are just horrible web design mistakes that you should not see in 2020 from a major IT company.
So would I buy one for home use? Yes, if they were very cheap at a swap meet and you are comfortable with the fact you may not be able to flash the very latest firmware on to them. If you are thinking of a purchasing a new device for home, I think that are too pricey for what they are and you are better off looking at something like Ubiquity makes, which I have had good experience with in the past.
Resources
PuTTY
Tftpd32
ap3g2-k9w7-tar.153-3.JH.tar firmware link that worked
Cisco Autonomous User Guide
Disclaimer
As stated earlier there are a ton of options in these access points so it’s best to familiarize yourself with the Cisco manual and make sure your setup is secure once you set it up. I have linked the Cisco manual above.