I have previously posted on some of my LED strips before. All of these have been RGB strips, where you can choose a single colour for the whole strip. They are relatively cheap and easy to set up with controllers that can be purchased off the shelf and used as is or flashed with Tasmota.
An alternative to the RGB type LED strips is digital addressable LED strips. Slightly more expensive than the RGB strips these strips can vary the colours and patterns along the whole strip. This makes them great fun for the Christmas tree with some people even using them to create a kind of very low res TV display. At the time of writing the best way of controlling these that I have found has been by the excellent open source project WLED. WLED runs on an esp8266 or ESP32 type device and can be controlled by the browser, an app or Home Assistant, this makes it perfect for my needs.
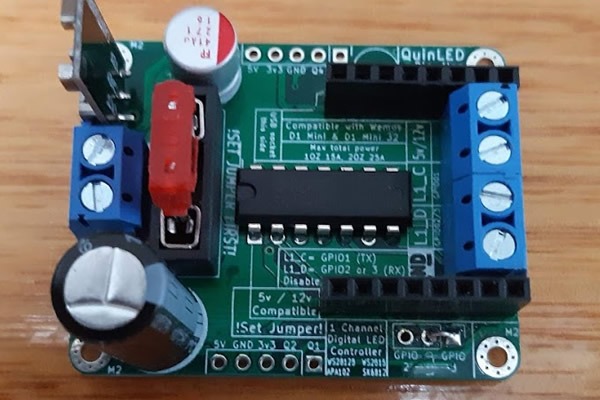
For the controller there was no decent and cheap off the shelf that I found to suit my needs. Fortunately it is not too hard to create one ourselves thanks to a Wemos D1 mini and a PCB known as the QuinLED-Dig-Uno. Alternatively an ESP32 that is pin compatible with the D1 mini can also be used with the Dig-Uno PCB.
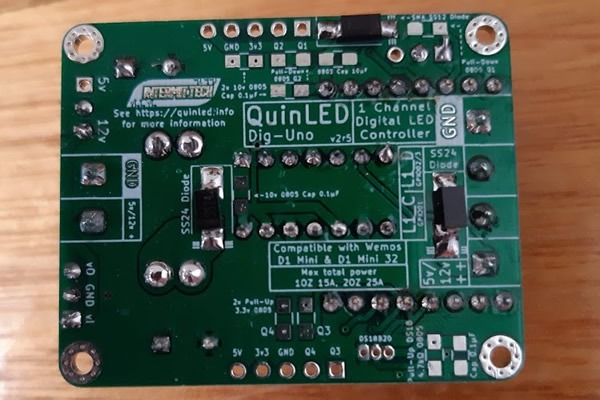
The reason for needing the QuinLED PCB is for the logic level shifter chip that is on the PCB. The Wemos D1 mini outputs 3.3v logic levels on the data line while the LED string expects 5v logic. While I have run a few LED strings data line straight off the Wemos D1 mini, it is said that the correct level gives the best performance.
One drawback that many people may find with the QuinLED PCB is the number of surface mount components that is on the PCB. Soldering surface mount components can be tricky even for the most experienced solderer. Fortunately as the PCB is designed as a generic PCB, many of these components can be left off as they are not used with the WLED firmware. Below are some of my tips if you are planning on building a similar setup yourself. This post assumes you are handy with electronic components and fairly proficient with a soldering iron.
My Tips on Using the QuinLED-Dig-Uno PCB with WLED
LEDs
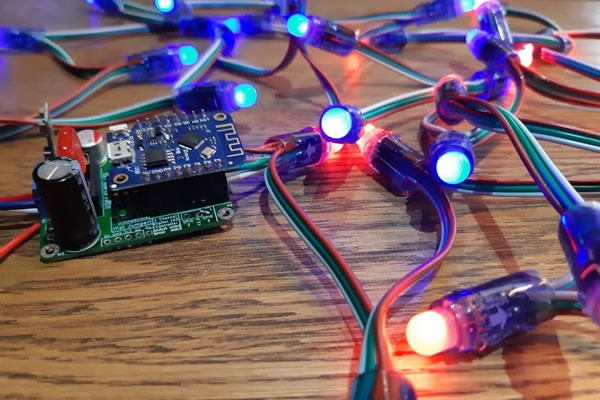
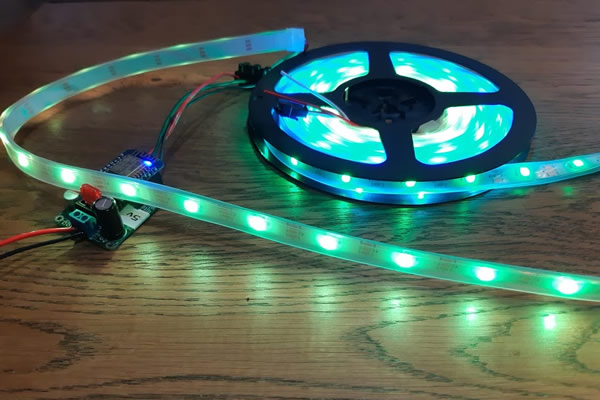
My favourite is the 12volt WS2811 variety as shown at the top of this post, which are perfect for the Christmas tree. A mate recently got a reel of these WS2812B LEDs like below, that look very solid and are also waterproof. Unfortunately these are a 5 volt variety meaning he now has a mixture of LED and controller setups. Sometimes you may need to do this to get the desired strip styles you want.
My tip is to label the controllers, PSUs and LED’s well to avoid releasing any magic smoke.
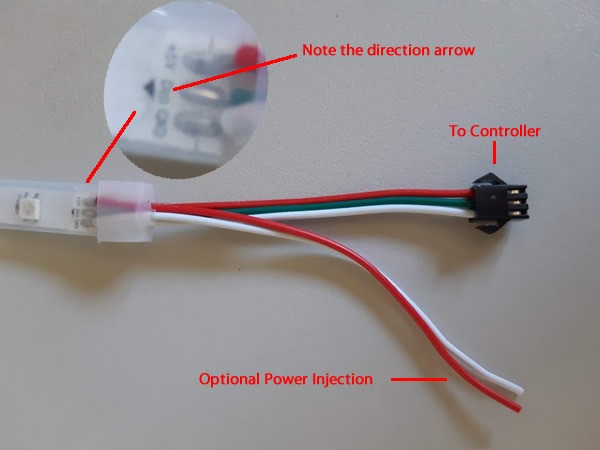
Note that all digital LEDs are directional, an arrow on the data line indicates that the data is flowing away from your controller. An extra pair of power wires is often also included at the end of the strip. If you are daisy-chaining many strips together sometimes you may need to inject some extra voltage further along the chain if brightness is fading off. Just make sure these loose wires don’t touch each other if they are not used.
Building the Quinled Dig Uno Board
Optional Components
Not all the surface mount components need to be fitted to the board when using it with WLED. The bare minimum I got my v2.5 board going with was just the diodes. Apparently v2.6 has two 51 ohm resistors on the data lines, so this version will require them as well (located between pin 7 and 8 of IC and not pictured below). Many of the other resistors and capacitors are for pull up for other options like the temperature sensor that you will not need if using with WLED. One surface mount capacitor that may be worth adding is the o.1uf filtering cap that sits between pin 1 and 14 of the IC. I have used the board with and without this and have not noticed any difference, your results may vary depending on the PSU used.
The QuinLED hardware guide states that the electrolytic capacitors are optional, I added them in as they are through hole components and are pretty easy to add in.
I also skipped adding jumper headers and just added a wire link on the voltage select and GPIO output select as I had no intention of ever changing the voltage on each PCB or the output pin. Each board I have made has been mated to its end use strip and PSU from the start to avoid any voltage mix ups.
Component Interchanges
For the 12v LED PCB I used this 5v DC-DC converter instead of the one listed on the quinled page as it was available from Banggood where I was ordering a few other bits. These DC-DC converter PCBs are the same layout as a TO-220 7805 voltage regulator and while a 7805 works, it does give off a bit too much heat. Any similar spec 5v DC-DC converter in the same layout should do the job.
If you are running 5v LEDs then you will need a 5 volt PSU and you can leave the 5v DC-DC converter off. Just remember to set the voltage select jumper correctly for the type of LEDs you are using.
I’ve built 4 of these boards so far and used SS24 diodes on 3 of them and SM5822b on one of them as that was what was available to me at the time. If you are going to interchange the diodes find something as good or better than the ss24 by comparing its data sheet here with what you are looking at using. Also don’t forget to orientate them the correct way, the white line on the diode should match the white line on the PCB.
Flashing WLED to the D1 Mini
I flash WLED to the D1 mini off the QuinLED PCB using the below software and test that I can get it onto my network before adding the D1 mini to the QuinLED board.
https://github.com/marcelstoer/nodemcu-pyflasher/releases
If using the ESP32 PCB flash with below as above won’t work.
https://github.com/esphome/esphome-flasher/releases
If using the D1 Mini, download the latest WLED from below, the file you are looking for is either WLED_0.x.x_ESP8266.bin if you jumpered the L1_D to gpio2 or WLED_0.x.x_ESP8266_ledpin3.bin if you jumpered L1_D to gpio3 (as I have in the pic above).
When using the faster ESP32 board you will need to jumper L1_D to gpio2 and download the file WLED_0.x.x_ESP32_ledpin16.bin
https://github.com/Aircoookie/WLED/releases
Using WLED
Once you have connected WLED to your network (start at step 3 on this page here) make sure you reserve its IP address either by doing so in your router or by setting the static IP address on the Wi-Fi settings page. If you are having trouble finding the device on the network I found the android app did a great job of finding it, and it displays its IP address there.
Also remember to update the amount of LEDs you have, the default setting is 30, so if you have more than this everything past LED number 30 won’t work if the correct amount is not set.
Connecting the LEDs to the Quinled PCB was as simple as connecting white to GND, Red to the 5V/12 terminal and Green (Data) to L1_D (next to GND). The L1_C terminal was not used in my application of the PCB.
Wrap up
If you are looking for a digital addressable LED controller. WLED and the Wemos D1 Mini are a perfect match. Adding the D1 Mini to the QuinLED Dig Uno PCB makes things a lot neater and safer. If you use Home Assistant like I do once the D1 Mini is on your network Home Assistant will pick it up right away. If you don’t use Home Assistant, you can control WLED form its built in web UI or from apps that available for both Android and IOS. While there are other open source projects, and you could even write your own Arduino code to run on this PCB combo, I have found WLED to be the nicest to use, very powerful if you need it to be and have also found it is very well-supported thanks to the project’s popularity.
Update 6-1-21
I have just designed a 3d printed case for the Quinled Dig Uno PCB, you can download the files at thingiverse here.
Resources
https://github.com/Aircoookie/WLED
https://quinled.info/2020/05/08/quinled-dig-uno-hardware-guide-2/
https://quinled.info/2020/06/09/quinled-dig-uno-soldering-guide-2/
3D Printed Case
https://www.thingiverse.com/thing:4711664
My Buying Guide
WS2811 12v Digital RGB LED string
WS2812B 5v Digital RGB LED Strip
Geekcreit D1 Mini compatible ESP32
Pre-assembled Quinled Dig Uno board alternative available here