One of my first esp82266 projects was my washing machine notifier that connected to ifttt to send me an email when my wash was done. I published this project to hackster.io back in December 2016 and it can also be found on my blog here. Since then I have found Home Assistant and my IOT devices around the home has grown with all of them connecting back to Home Assistant, so it was time I converted my washing machine notifier over from ifttt.
To recap what my washer notifier did is to read the light level of the on led of my washing machine via a LDR connected to an ESP8266 based Wemos D1 Mini and then act on the increased light level when the washer is in on mode.
My plan for Version 2 of my washing machine notifier was to get this info to Home Assistant with as little cost and redesign as possible. One option was to do away with the Wemos D1 mini altogether and implement a similar option to what I have done with my dryer, but that would require the purchase of another D-link smart plug. Seeing that I already had the cheaper D1 mini already hooked up to the washer I decided to go with the 2nd option of replacing the code on the D1 mini to talk to Home Assistant rather than ifttt.
The IOT world has grown rapidly since I first did my washer notifier, so instead of rewriting my original washer notifier code I decided to look around and see if there was any pre-written code or firmware around that could deal with sending LDR data to Home Assistant. Sure enough I found Ben at Bruh Automation had created an esp8266 sensor module with arduino code. The code is well documented and he even has created a fantastic video on youtube about it. Although I am only using the LDR section of the sensor and I am using the code on the Wemos D1 mini rather than his nodeMCU board, the code uploads and runs just fine on my D1 Mini with no changes to my original washer hardware design.
Hardware
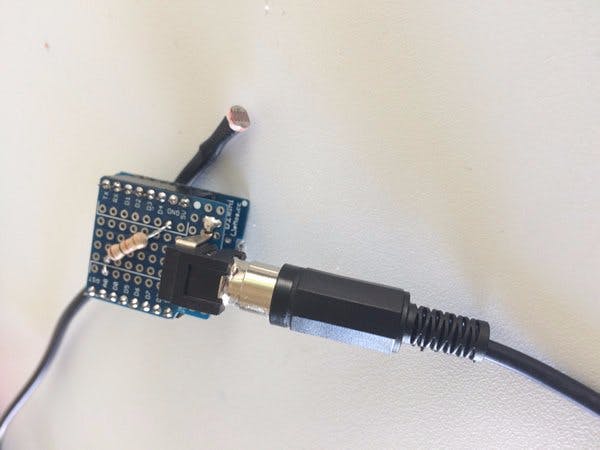
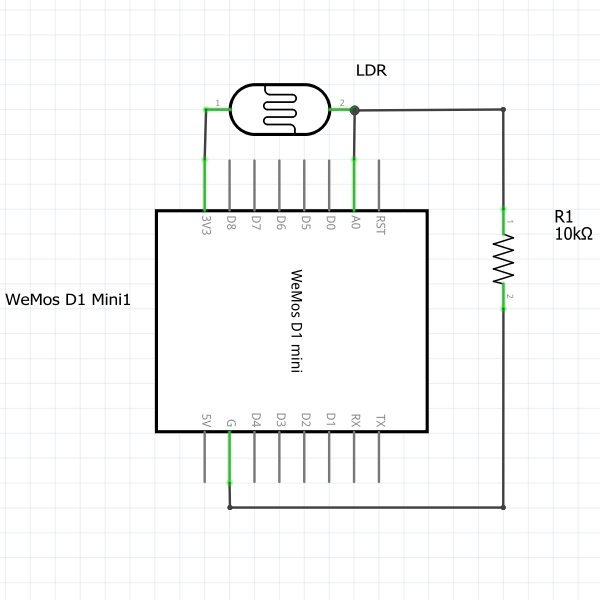
Wiring is the same as as my previous washing machine notifier and is as simple as putting a LDR from the 3V3 pin to the ADC Pin (labelled A0 on the D1 Mini) and a 10k resistor from the same ADC pin to ground.
Code
The new code for the Wemos D1 Mini is based on Arduino and can be found on Bruh Automation’s GitHub page here. The only changes you will need to make are around line 45 to 51, adding your WiFi SSID, password and MQTT Server details.
Optionally you can also create a unique mqtt state topic around line 56, the default is shown in the code as.
#define light_state_topic “bruh/sensornode1“
I changed my state topic to bruh/washer, if you change yours remember what it was as you need to adjust the Home Assistant config to match.
If you don’t have a MQTT server you will need to install the MQTT broker add on and configure it via the Hass.io plugin or install your own. The code is flashed to the Wemos d1 mini via the Arduino IDE, if you have never done this before Ben’s multi sensor video goes over it in detail.
Home Assistant Config
If you got you D1 mini flashed ok you should be able to see it connecting to WiFi and reporting values (if the ldr is connected) via the Arduino IDE serial monitor. Now it is time to configure Home Assistant to use these values to report the washers state and act on when your washing machine turns off.
In your configuration.yaml file add the following add the following under your sensor and input_boolean sections. The sensor part is where the LDR value is reported while the input boolean is kind of a fake switch that we will turn on or off with an automation based on the value of the sensor. Make sure you match the sensor state topic with what you made it in the Arduino code.
sensor:
  - platform: mqtt
    state_topic: "bruh/washer"
    name: "Washer LDR"
    unit_of_measurement: "LUX"
    value_template: '{{ value_json.ldr }}'

input_boolean:
  washer_switch:
    name: Washer
    initial: off
    icon: mdi:washing-machine
The Bruh multi sensor github page has a few more sensor examples if you are adding extra sensors. As we are only using the LDR with this project the above sensor config is all you need.
For our automations.yaml we need to add the following to change our fake washer switch when the washer turns on or off and to act on the outcome of the washer turning off. Changes you will have to make here are possibly the LDR values here depending on what your washer LDR reports when the washer is off and on and the washing done announcement section. I am using google text to speech as well as the Telegram notifications platform to send me a washing done announcement. You will need to adjust to whatever platform or devices you use in your setup.
# Washer switch state on
- id: washer_on
  alias: Washer On
  trigger:
  - entity_id: sensor.washer_ldr
    platform: numeric_state
    above: '300.0'
    for:
      minutes: 1
  action:
  - service: input_boolean.turn_on
    entity_id: input_boolean.washer_switch


 # Washer switch state off
- id: washer_done_switch_state
  alias: Washer Done switch state
  trigger:
  - entity_id: sensor.washer_ldr
    platform: numeric_state
    below: '300.0'
    for:
      minutes: 1
  condition:
  - condition: state
    entity_id: 'input_boolean.washer_switch'
    state: 'on'
  action:
  - service: input_boolean.turn_off
    entity_id: input_boolean.washer_switch


# Washer Done announcement
- id: washer_done
  alias: Washer Done
  trigger:
  - entity_id: input_boolean.washer_switch
    platform: state
    to: 'off'
  condition:
  - condition: time
    after: '8:00:00'
    before: '23:00:00'
  action:
  - service: tts.google_translate_say
    entity_id: media_player.hallway_speaker
    data:
      message: 'Your Wash is Done.'
      cache: true
  - service: notify.telegram
    data_template:
      title: Your wash is done.
      message: "The washing machine has finished."
Final Thoughts
And that should be it, your washer will now be available as an entity in Home Assistant and you can set an automation to trigger a washing done notification. If you have read my dryer done notification post before you may notice my Home Assistant config for this project is very similar to what I did then, as I stated earlier in this post this version 2 of my washing machine notifier project was to be done with as little redesign as possible. So that’s why I have not reinvented the wheel on the automations, as these have been running with my dryer project without fail for several months now.
When placing the LDR over the washer’s power LED make sure no light from another source can get in and muck up your sensor values. I actually removed the control board, folded over the LED and placed the LDR on top connecting the two in black heat shrink.
If the thought of all this coding and modding your washer doesn’t appeal to you, check out my previous dryer notification project. It is much simpler but a bit more expensive.