 If you have done anything with home automation before you would have heard of ZigBee. ZigBee is a protocol many smart devices use to communicate with. One of the most well known products is Philips Hue where their range of smart lamps, sensors and switch’s communicate back to their hue bridge that is attached to your network. A benefit of ZigBee is the ability of powered devices like lamps to act as a mesh router so if you lamp at the other end of the house can’t reach your hue bridge its data can hop across a closer lamp that is nearer to your bridge.
One drawback of the ZigBee system is each manufacturer’s bridge seems to only support their own devices. If you are lucky you may get an Ikea Tradfri lamp connected to a Philips Hue bridge but forget about adding a Xiaomi sensor to another manufacturers bridge. Once your smart home grows you will find you will soon have a variety of ZigBee networks across your house all talking to their own bridge. While each bridge can be cheap, this layout is very inefficient. Also if you only use your Xiaomi bridge to talk to battery powered sensors then you miss out on the mesh advantages of ZigBee.
This was the issue I faced, my hue network contains 4 hue lamps and a dimmer in a small area and does not miss a beat. But my Xiaomi ZigBee network contained all battery powered temperature and door/window sensors over a large area that would often see a few sensors randomly drop off the network. Also the Xiaomi Hub would sometimes lose connection to my smart home controller, Home Assistant.
Once I found the github project zigbee2mqtt I knew this would be a good option to replace the Xiaomi Hub. I already had a mqtt server setup with Home Assistant and there was also a hass.io plugin that made setting up zibee2mqtt a breeze.
Getting started with zigbee2mqtt
The docs for zigbee2mqtt are pretty self-explanatory so I won’t repeat the flashing process, just be aware you will need to make a ZigBee coordinator that will plug into the USB port of your Home Assistant server. The parts you will need to build are listed below and the guide to follow to flash the coordinator is here https://www.zigbee2mqtt.io/getting_started/flashing_the_cc2531.html
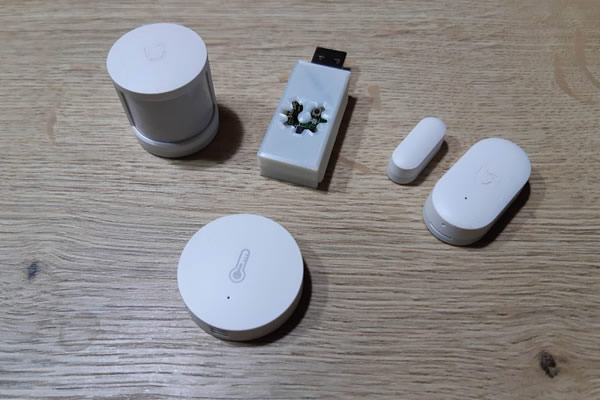
Parts needed to make a zigbee2mqtt co-coordinator
I ordered both the CC2531 ZigBee Sniffer and adapter cable from here
https://www.aliexpress.com/item/CC2531-Zigbee-Sniffer-Wireless-Board-Bluetooth-BLE-4-0-Dongle-Capture-Module-USB-Programmer-Downloader-Cable/32920807462.html
I ordered the CC Debugger from here
https://www.aliexpress.com/item/Wholesale-CC-DEBUGGER-Debugger-and-Programmer-for-RF-System-on-Chips-TI-ORIGINAL-2540-2541-2530/32418374637.html
(unfortunately I could not find a seller who had all the products together, so the parts showed up at different times, if you find a better source let me now in the comments).
Home Assistant Setup
NOTE: The below instructions are for the Hass.io install of Home Assistant.
First click on the Hass.io menu of Home Assistant followed by ADD-ON STORE. Then add the below url into the “Add new repository by URL” box and click add.
https://github.com/danielwelch/hassio-zigbee2mqtt
After a few minutes down the bottom of the store you will see the Zigbee2mqtt Hass.io Add-on click on Zigbee2mqtt and chose install. After a few minutes the Zigbee2mqtt add on will be available under your hass.io dashboard. You will need to click on it then scroll down to config and update your mqtt server details. The serial port option refers to where your USB stick is plugged into. In my case the default option of “/dev/ttyACM0” was correct but you can double-check this is there under system the hardware of the hass.io dashboard.
Example of my zigbe2mqtt config
{
  "data_path": "/share/zigbee2mqtt",
  "homeassistant": true,
  "permit_join": false,
  "mqtt_base_topic": "zigbee2mqtt",
  "mqtt_server": "mqtt://192.168.1.10",
  "serial_port": "/dev/ttyACM0",
  "devices": [],
  "network_key": [],
  "mqtt_user": "billybob",
  "mqtt_pass": "billybobsnotrealpass"
}
To get a device to join you need to enable joining, While leaving permit_join to true in your config is a possibility it’s not a really good idea to do so. There are some instructions over on the zigbee2mqtt plugin github page to add to your home assistant configuration and automation yaml files but if you want to jump straight in you can just publish a permit join message from home assistant’s developer tools toolbar like below.
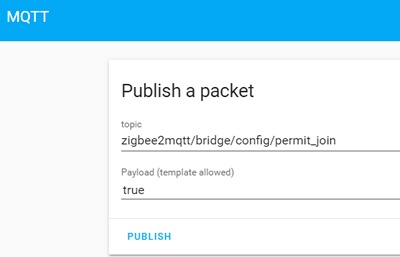
If you refresh the logs on the zigbee2mqtt plugin page you will see if permit join has been enabled so you can start pushing the pair button your device (the Xioami devices took almost a minute of pushing while refreshing the page before I was sure they were paired). Once paired the device will show up under home assistants mqtt integrations page where you can give them a friendlier name than just their ZigBee id. Once everything you have is paired remember to turn send a false payload to zigbee2mqtt/bridge/config/permit_join to disable pairing.
My Tips
If your devices were already paired to another hub I would recommend removing them first from that hub and then restarting home assistant, especially if you intend giving them the same name as there were on the old hub.
A great way to visualise what is on your Zigbee network is via this custom component below, these instructions in the first post are pretty self-explanatory. If you don’t have a custom_components or www folder on your hass.io build create them under the config folder.
https://community.home-assistant.io/t/zigbee2mqtt-show-the-networkmap-in-home-assistant/89116
Adding powered devices to the network will increase the range of all your devices. If you can’t do this, consider building a Zigbee Router as well, the flashing process is similar to what you need to do to build the Zigbee2mqtt coordinator.
I like the cheap Xiaomi door and window sensors as well as their Temp/Humidity sensors. I am not a big fan of their motion sensors, they are quick to turn on but slow to reset, the Philips hue sensors were not that much better either, maybe this is a limitation with motion sensors on ZigBee.
Resources