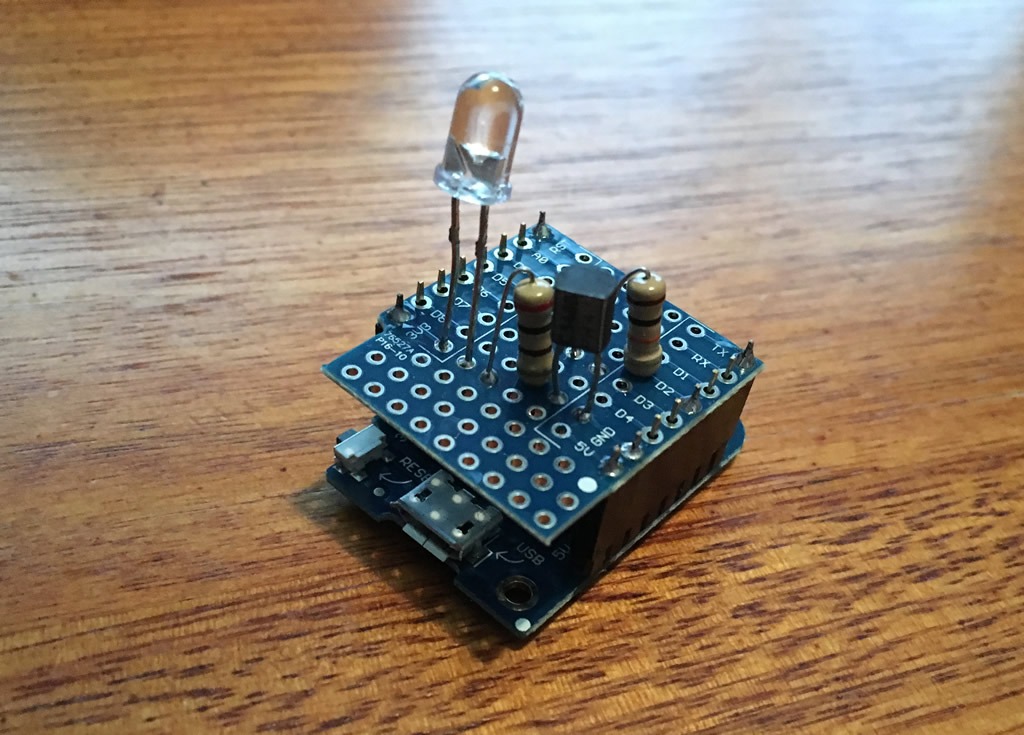
 This post is a follow on from my previous post about using ESP Easy on a Wemos D1 Mini to create an IR blaster. The hardware side of things is exactly the same so head on over that post if you need more info on the hardware side first. What we are creating here is an IR blaster using a Wemos D1 Mini that connects to Home Assistant via MQTT so we are assuming you have these set up as well.
So I decided to keep all my Wemos Mini devices on the one firmware and as Tasmota is used on most of my devices and is also my favorite, it was time to change out ESP Easy for Tasmota on my IR blaster.
To flash your Device with Tasmota follow my steps on my previous post
Flashing the D1 mini with Tasmota the easy way.
Setting up Tasmota for IR
Now that you have Tasmota on your device and connected to WiFi it’s time to set it up for IR sending, login to Tasmota via the IP address you found in my flashing guide. If you followed the hardware setup from my previous IR blaster post you will need to configure Tasmota to IRsend on GPIO4. This setting can be found under Configuration/ Configure Module. The module also needs to be set to generic for the D1 mini.
The next thing you need to setup is the details of your Home Assistant MQTT server found under Configuration/ Configure MQTT, create a unique topic name and remember what you called it as we will need this later in the Home Assistant setup.
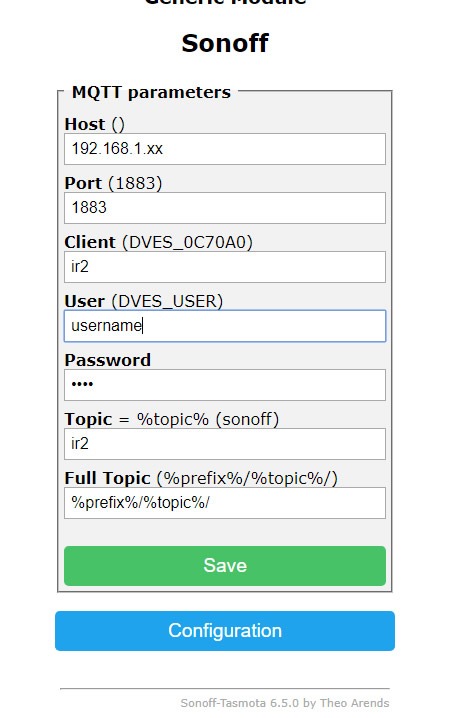
Other optional setting I like to tidy up are the Hostname under Configure WiFi and web password and friendly name under Configure Other.
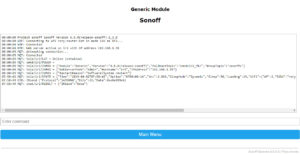
The last option to set is important and has to be done via the console, go to the section named console and type in the following line where it says Enter Command the press enter.
SetOption29 0
This Command sets Tasmota IR to hex. The IR codes I captured in my previous post were in a hex format. One thing different between Tasmota and ESPEasy is when sending the code it needs to be proceeded by 0x. An example is with my Samsung on code of e0e09966 needs to be sent as 0xe0e09966 with Tasmota.
Testing with Tasmota
To test from the Tasmota interface go to the section named console and type in the following IRSend line where it says Enter Command the press enter.
For Samsung on IR send command use.
IRsend {“Protocol”:”SAMSUNG”,”Bits”:32,”Data”:0xe0e09966}
For Samsung off IR send command use.
IRsend {“Protocol”:”SAMSUNG”,”Bits”:32,”Data”:0xe0e019e6}
If successful you will get a done response as shown below and your device should do what you asked it to do. Also if you watch the IR led using a smartphone camera, you also should see it blink quickly as the camera picks up the IR light that your eye balls can’t see.
Testing with Home Assistant
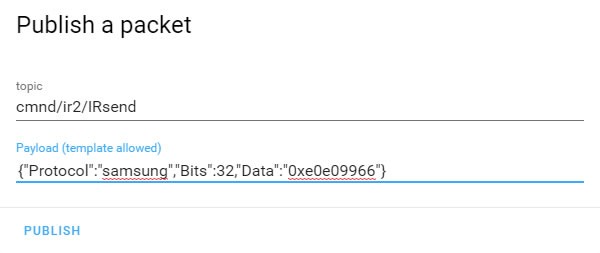
If you want to test in Home Assistant before adding the device to your config you can publish an IRSend command from the MQTT section of developer tools like below. Change the ir2 bit to whatever you made your topic earlier. This example below should turn on my Samsung TV.
Adding the IR blaster to Home Assistant
Now that you know your blaster works in Home Assistant you can add to the switch section of your configuration.yaml the following mqtt platform. Adjust for whatever you made your topic and whatever your required remote codes are.
Switch:
  - platform: mqtt
    name: "TV"
    command_topic: "cmnd/ir2/IRsend"
    payload_on: '{"Protocol":"samsung","Bits":32,"Data":"0xe0e09966"}'
    payload_off: '{"Protocol":"samsung","Bits":32,"Data":"0xe0e019e6"}'
Finally check your config and restart Home Assistant, you should now have a switch.tv entity if you named it as above. When you add the switch to your UI it will look something like below.

Finding your remote codes
As I mentioned in my previous post I also have a Led strip controller running Tasmota that has an IR receiver on it and that’s how I discovered my TV on and off codes. It would be easy to add a receiver to this device, you would just have to set IRrecv on whatever Gpio you connect it to. This site here has some good info on IR receiver hardware and the D1 Mini. Other alternatives for finding your codes is trial and error via several online databases of IR codes but you will need to google this for yourself.
Update April 2020
I have since added IR control to Home Assistant with an off the shelf solution. If the DIY route is not your thing, check out what I did here.