 One of my first IOT projects and the first post on this blog was my washing machine notifier. It is based around the ESP8266 and a LDR (light dependent resistor) placed over the top of the power LED of my Fisher and Paykel Washing Machine. The first iteration of this project used my own LUA code connecting to IFTTT. The second version swapped out the IFTTT code for code written by a YouTuber to connect to Home Assistant via MQTT. In this third crack at this project, I convert the device to ESPHome and simplify my Home Assistant setup.
Background
My first go at this project was way back in 2017, and before I found Home Assistant. I eventually moved it over to communicating with my Home Assistant install in 2019 after some changes with IFTTT that led me to give up on service. It’s been running fine since then thanks to a project by YouTuber Bruh Automation, that I adapted to my same hardware without much effort. I recently changed my MQTT server details, so I needed to either fire up the Arduino IDE and change my details or revisit the project and adapt it to something much easier to configure direct from Home Assistant. Fortunately, the ESPHome website had just the example I need to adapt to a 2023 version. While I was at it, I added a bit more on the ESPHome side to reduce manual configuration on the Home Assistant side. Home Automation has come a long way since I first made my washing machine smart, so it is good to see projects like this evolve.
Hardware
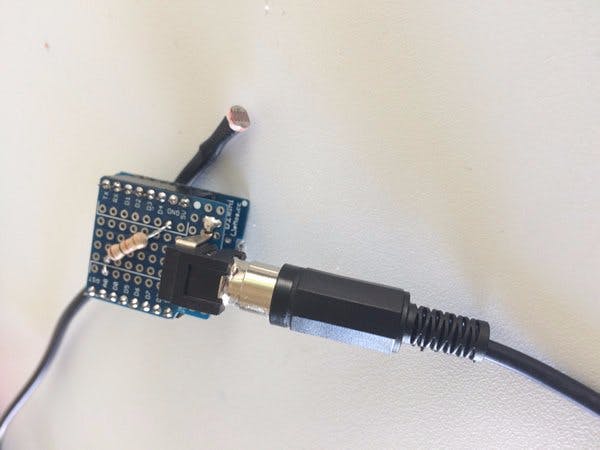
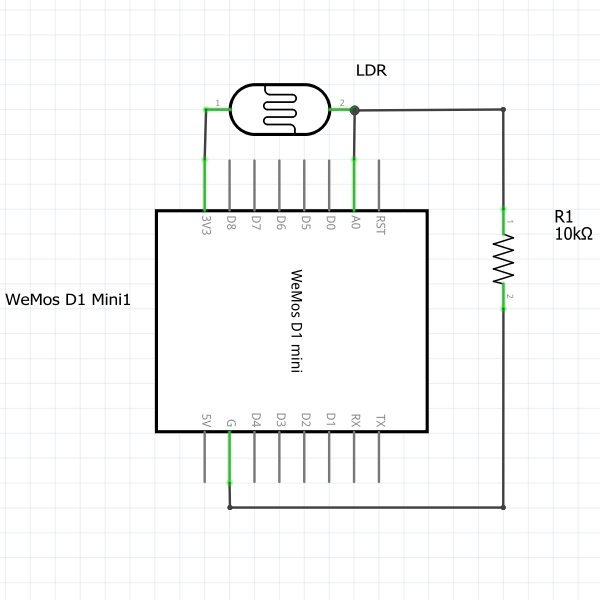
In all 3 versions of this washing machine sensor, the hardware setup remains the same with a LDR connected between the Analog in pin “A0” of an Esp8266 based Wemos D1 mini and 3.3v with a 10k resistor between A0 and ground as shown below. I used a D1 mini prototype PCB for the resistor placement and an RCA connector to connect to the LDR, so I could unplug it from the machine without removing the LDR. In my case I buried the LDR below the control panel next to the washers Power LED to avoid light bleed from the outside world false triggering the sensor.
ESPHome Config
The ESPHome config started off pretty basic, and the first half of the file is the auto generated config you get when you first create a new device. The main difference this time is that I am using the default Home Assistant API rather than MQTT to communicate between the now ESPHome based D1 Mini with Home Assistant. This change also means one less manual MQTT sensor in the Home Assistant config file.
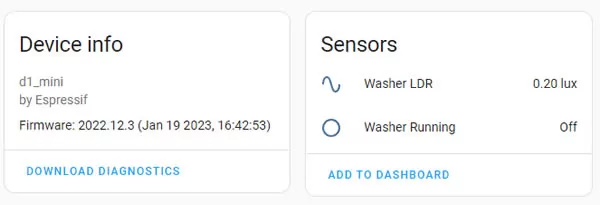
My additions start below the Captive Portal line. The first section reads the LDR on pin A0 and creates a sensor in both ESPHome and Home Assistant that we can use to trigger the next section, which is a binary sensor. This binary sensor will be in an on or off state depending on the light intensity of the washing machine’s power LED.
I also had to adjust the numeric state of the sensor, as it reported differently to the v2 code I had used in Home Assistant. (I doubt this LDR sensor provides a true representation of lux, but it is good enough to use as trigger for my automation). This value is found on the line “if (id(washldr).state > 120)“, where 120 is a value below what the washer LDR sensor reports when my washing machine is on (generally around 150 to 190ish). When the washer is off, the LDR sensor reports zero or very close to it, which triggers the binary sensor to turn off. My guess is that everyone will experience different on or off values here.
esphome:
  name: washing-machine

esp8266:
  board: d1_mini

# Enable logging
logger:

# Enable Home Assistant API.
api:
  encryption:
    key: "redacted-gibberish"

ota:
  password: "redacted-gibberish"

wifi:
  ssid: !secret wifi_ssid
  password: !secret wifi_password

  # Enable fallback hotspot (captive portal) in case wifi connection fails.
  ap:
    ssid: "Washing-Machine Fallback Hotspot"
    password: "randomsecret"

captive_portal:

# Returns the Lux value from the LDR connected to Pin A0.
sensor:
  - platform: adc
    pin: A0
    name: "Washer LDR"
    id: "washldr"
    device_class: ""
    unit_of_measurement: lx
    filters:
      - lambda: |-
          return (x / 10000.0) * 2000000.0;

# Displays a binary sensor state depending on lux above.
# Need to edit the number (120) to a value below the lux reading
# of above when the washer is on.
binary_sensor:
  - platform: template
    name: "Washer Running"
    lambda: |-
      if (id(washldr).state > 120) {
        return true;
      } else {
        return false;
      }
Once you add the Device to ESPhome head over to Home Assistant’s Settings / Devices & Services menu, and the device will be ready to adopt into Home Assistant. If you have not got the LDR value right just yet, don’t be too concerned. You can always edit the ESPHome config and delete the device, it will be rediscovered on the next Home Assistant Reboot.
The Device as shown under Home Assistant’s Devices & Services / Esphome menu.
Automations
The automations to tell me my wash is done is cut down from my version 2 example to one simple notification automation. Once the binary sensor provided by ESPHome above turns off for a minute, then a message is broadcast via my Google Home Mini.
alias: Washer Done Notification
trigger:
  - entity_id: binary_sensor.washer_running
    platform: state
    from: 'on'
    to: 'off'
    for:
      minutes: 1
condition:
  - condition: time
    after: "08:00:00"
    before: "23:00:00"
action:
  - service: tts.google_translate_say
    entity_id: media_player.hallway_speaker
    data:
      message: Your Wash is Done.
      cache: true
Wrap Up
This has been a fun project that I have enjoyed seeing it evolve while learning more about IOT gadgets, code and Home Assistant. It would have been easier to toss this project in the bin and replace it with a smart plug to get usage date that way as I did with my clothes dryer, but this D1 Mini was already on hand and fitted to my washer, knocking up the code in ESPHome and getting it back into Home Assistant again was quicker than heading of and buying a new smart plug.
Resources
The first version of this project
https://www.inspectmygadgets.com/esp8266-washing-machine-notifier/
The second version of this project
https://www.inspectmygadgets.com/esp8266-washing-machine-notifier-version-2/
An alternate way to track devices like washers and dryers
https://www.inspectmygadgets.com/making-a-dumb-dryer-smart/
ESPHome’s example code I partly used for above
https://esphome.io/cookbook/bruh.html